# Pose, Apply Materials and Render

### **Step 1: Pose Your Model**

Go to the "Rendering" tab and select the "Lying on the Ground" command.

![](https://www.rhinoartisan.com/wp-content/uploads/2024/08/Group-7221-1024x91.png)

Select both the gemstone and the shank

![](https://www.rhinoartisan.com/wp-content/uploads/2024/07/Pose-1024x557.jpg)

In the command bar, select the axis on which you want to pose the model. In this case, choose the X-axis, which is selected by default.

![](https://www.rhinoartisan.com/wp-content/uploads/2024/07/image-47-1024x195.jpg)

Press "Enter" and wait for the model to position itself automatically.

![](https://www.rhinoartisan.com/wp-content/uploads/2024/07/Pose-1-1024x557.jpg)

### **Step 2: Apply Materials**

Go to the **Render and Animation** panel located on the right side of the interface.

![](https://www.rhinoartisan.com/wp-content/uploads/2024/08/image-1216-1-1024x527.png)

Alternatively, you can access this panel by going to the **Rendering** tab and clicking on the **Render and Animation** command, located on the far left.

![](https://www.rhinoartisan.com/wp-content/uploads/2024/07/Group-31-1024x108.jpg)

In the 'Render and Animation' panel, choose 'Yellow Gold 18k' for the metal of the shank. Select the shank and double-click on the material.

![](https://www.rhinoartisan.com/wp-content/uploads/2024/07/Group-32-1-1024x471.jpg)

Apply a diamond material to the gemstone. Drag the material and drop it on the gem.

![](https://www.rhinoartisan.com/wp-content/uploads/2024/07/Group-33-1024x478.jpg)

To finish, apply a basic reflection material for ground.

![](https://www.rhinoartisan.com/wp-content/uploads/2024/07/Group-34-1024x658.jpg)

### **Step 3: Render Your Design**
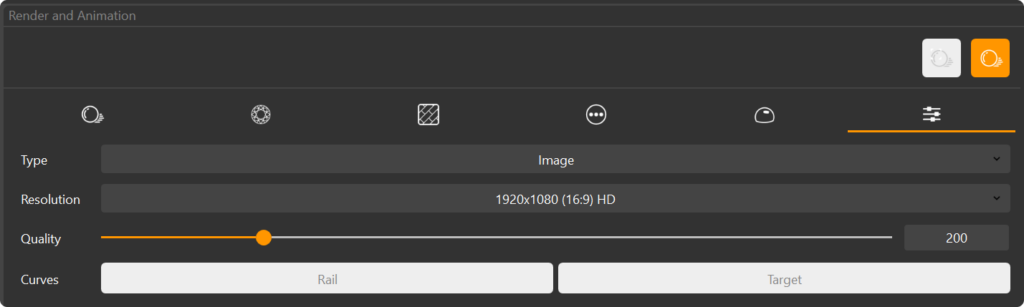
Set the resolution to **1920 x 1080** (19:9) HD for a high-quality output, leave the **Quality** setting at **200**, which is the default setting.

![](https://www.rhinoartisan.com/wp-content/uploads/2024/08/image-1219-1024x307.png)

**Safe frames** indicate the visible area of the render; anything outside these frames will not be included in the final image. Adjust the model's position so that all important elements are within the safe frames. Adjust the view for rendering in the perspective view to get the best angle.

![](https://www.rhinoartisan.com/wp-content/uploads/2024/07/image-1219-1-1024x552.png)

Once everything is set, press the **Render** ![](https://www.rhinoartisan.com/wp-content/uploads/2024/07/image-1218-1.png) button to generate your final image.

![](https://www.rhinoartisan.com/wp-content/uploads/2024/07/001-02-Floating-Ring-Render-1024x576.png)

Your model will now be rendered with high-quality materials, showcasing the beauty of your floating Ring in stunning detail.

### **Video Lesson**

{% embed url="<https://www.rhinoartisan.com/wp-content/uploads/2024/07/Render.mp4>" %}
