# Planar Mapping
##  Planar Mapping
The ApplyPlanarMapping command adds a texture mapping channel to an object and sets the mapping type to planar.
### **Steps**
1. Select[ ](https://docs.mcneel.com/rhino/8/help/en-us/popup_actions/select_objects.htm)objects, and press Enter.
2. Draw the mapping widget box.
3. Select UV for 2D mapping, or UVW for 3D.
4. Enter a mapping[ ](https://docs.mcneel.com/rhino/8/help/en-us/popup_moreinformation/mapping_channels.htm)channel number, or press Enter to accept the default value.
***
### Command-line options
-BoundingBox: Uses the object bounding box to determine the location and size of the mapping widget
* CPlane: Uses Construction plane coordinates for the bounding box.
* World: Uses World coordinates for the bounding box
**Box**\
Draws a box to add a planar mapping widget.
* The vertical direction of the box defines the W direction that is used by 3D procedural textures, such as [Wood](https://docs.mcneel.com/rhino/8/help/en-us/commands/textures.htm#wood), [Noise](https://docs.mcneel.com/rhino/8/help/en-us/commands/textures.htm#noise), [Granite](https://docs.mcneel.com/rhino/8/help/en-us/commands/textures.htm#granite), etc.
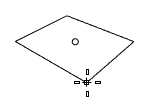
**(Default)**\
Draws the rectangle using two opposite corners.
**3Point**\
Draws the rectangle using two adjacent corner locations and a location on the opposite side.
**EdgeMidpoint**\
Draws the rectangle from the midpoint of the first edge, an end of the edge, and a location on the opposite side.
**Vertical**\
Draws the rectangle perpendicular to the construction plane.
**Center**\
Draws the rectangle from the center point and a corner.
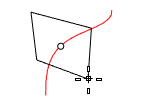
**AroundCurve**\
Draws a rectangle perpendicular to a curve.
**Steps**
1. Select a curve and pick the center of the rectangle on the curve.
***
For more information, please refer to the [Rhino documentation](https://docs.mcneel.com/rhino/8/help/en-us/properties/texturemapping.htm#ApplyPlanarMapping).
---
# Agent Instructions: Querying This Documentation
If you need additional information that is not directly available in this page, you can query the documentation dynamically by asking a question.
Perform an HTTP GET request on the current page URL with the `ask` query parameter:
```
GET https://docs.rhinoartisan.com/rendering/commands/textures/planar-mapping.md?ask=
```
The question should be specific, self-contained, and written in natural language.
The response will contain a direct answer to the question and relevant excerpts and sources from the documentation.
Use this mechanism when the answer is not explicitly present in the current page, you need clarification or additional context, or you want to retrieve related documentation sections.
Planar Mapping
The ApplyPlanarMapping command adds a texture mapping channel to an object and sets the mapping type to planar.
### **Steps**
1. Select[ ](https://docs.mcneel.com/rhino/8/help/en-us/popup_actions/select_objects.htm)objects, and press Enter.
2. Draw the mapping widget box.
3. Select UV for 2D mapping, or UVW for 3D.
4. Enter a mapping[ ](https://docs.mcneel.com/rhino/8/help/en-us/popup_moreinformation/mapping_channels.htm)channel number, or press Enter to accept the default value.
***
### Command-line options
-BoundingBox: Uses the object bounding box to determine the location and size of the mapping widget
* CPlane: Uses Construction plane coordinates for the bounding box.
* World: Uses World coordinates for the bounding box
**Box**\
Draws a box to add a planar mapping widget.
* The vertical direction of the box defines the W direction that is used by 3D procedural textures, such as [Wood](https://docs.mcneel.com/rhino/8/help/en-us/commands/textures.htm#wood), [Noise](https://docs.mcneel.com/rhino/8/help/en-us/commands/textures.htm#noise), [Granite](https://docs.mcneel.com/rhino/8/help/en-us/commands/textures.htm#granite), etc.
**(Default)**\
Draws the rectangle using two opposite corners.
**3Point**\
Draws the rectangle using two adjacent corner locations and a location on the opposite side.
**EdgeMidpoint**\
Draws the rectangle from the midpoint of the first edge, an end of the edge, and a location on the opposite side.
**Vertical**\
Draws the rectangle perpendicular to the construction plane.
**Center**\
Draws the rectangle from the center point and a corner.
**AroundCurve**\
Draws a rectangle perpendicular to a curve.
**Steps**
1. Select a curve and pick the center of the rectangle on the curve.
***
For more information, please refer to the [Rhino documentation](https://docs.mcneel.com/rhino/8/help/en-us/properties/texturemapping.htm#ApplyPlanarMapping).
---
# Agent Instructions: Querying This Documentation
If you need additional information that is not directly available in this page, you can query the documentation dynamically by asking a question.
Perform an HTTP GET request on the current page URL with the `ask` query parameter:
```
GET https://docs.rhinoartisan.com/rendering/commands/textures/planar-mapping.md?ask=
```
The question should be specific, self-contained, and written in natural language.
The response will contain a direct answer to the question and relevant excerpts and sources from the documentation.
Use this mechanism when the answer is not explicitly present in the current page, you need clarification or additional context, or you want to retrieve related documentation sections.