# Bail
### **Step 1**: Bail Command
In the **Components** tab, use the **Bail** command.
 ### **Step 2**: Bail Library and O-Ring
Select the **BL03** model and disable the **O-Ring**.
### **Step 2**: Bail Library and O-Ring
Select the **BL03** model and disable the **O-Ring**.
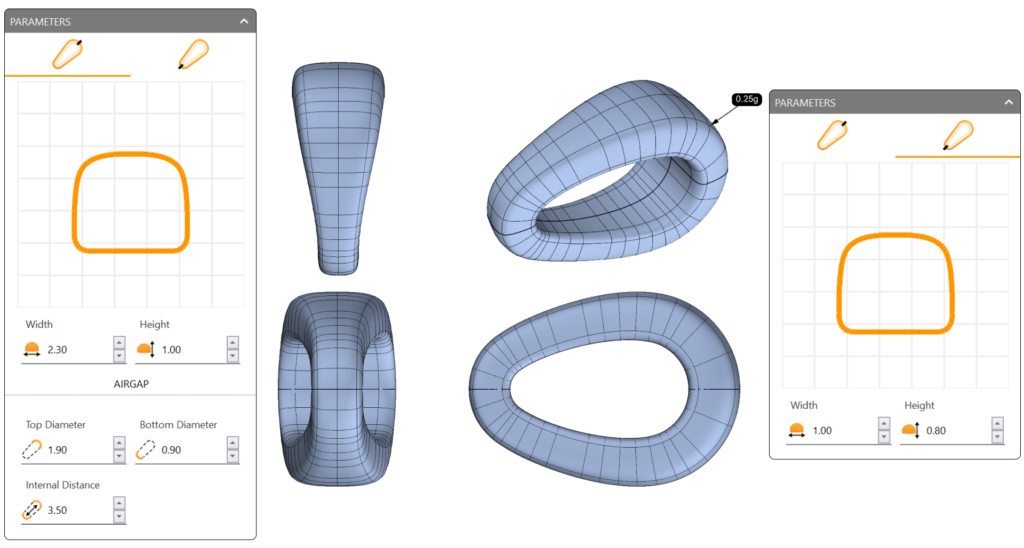
 ### **Step 3**: Parameters
Adjust the parameters as follows:
**First Curve**
* Width: 2.3 mm
* Height: 1.0 mm
**Second Curve**
* Width: 1.0 mm
* Height: 0.8 mm
**Airgap**
* Top Diameter: 1.9 mm
* Bottom Diameter: 0.9 mm
* Internal Distance: 3.5 mm
### **Step 3**: Parameters
Adjust the parameters as follows:
**First Curve**
* Width: 2.3 mm
* Height: 1.0 mm
**Second Curve**
* Width: 1.0 mm
* Height: 0.8 mm
**Airgap**
* Top Diameter: 1.9 mm
* Bottom Diameter: 0.9 mm
* Internal Distance: 3.5 mm
 ### **Step 4**: Display Modes
Switch to **Ghosted** visualization mode to view the inside of the bezel.
### **Step 4**: Display Modes
Switch to **Ghosted** visualization mode to view the inside of the bezel.
 ### **Step 5**: Diameter Command
In the **Curve** tab, use the **Diameter** command.
### **Step 5**: Diameter Command
In the **Curve** tab, use the **Diameter** command.
 ### **Step 6: Inner Curve**
As the first point, select the **inner curve of the bezel**.
### **Step 6: Inner Curve**
As the first point, select the **inner curve of the bezel**.
 ### **Step 7**: Create the Diameter Curve
Type **2.05 millimeters** and select a point on the Y-axis at the Bail's location.
### **Step 7**: Create the Diameter Curve
Type **2.05 millimeters** and select a point on the Y-axis at the Bail's location.
 ### **Step 8**: Pose the bezels
In the **Right** view, select all bezels and gems, and adjust the height to align approximately at the center of the bezel using the curve created.

### **Step 9**: Pipe Command
In the **Solid** tab, use the **Pipe** command.
### **Step 8**: Pose the bezels
In the **Right** view, select all bezels and gems, and adjust the height to align approximately at the center of the bezel using the curve created.

### **Step 9**: Pipe Command
In the **Solid** tab, use the **Pipe** command.
 ### **Step 10: Create the O-Ring**
Ensure **Diameter mode** is selected, type **0.6 millimeters** for the diameter, and press **Enter** twice.

### **Step 11:** Save in the Curator Panel
Select everything and save it in the **Curator** panel.

### **Video Lesson**
{% embed url="" %}
**Next Step**: Start with the second model.
---
# Agent Instructions: Querying This Documentation
If you need additional information that is not directly available in this page, you can query the documentation dynamically by asking a question.
Perform an HTTP GET request on the current page URL with the `ask` query parameter:
```
GET https://docs.rhinoartisan.com/tutorials/iconic-fashion-creations/bezel-set-pendant/bail.md?ask=
```
The question should be specific, self-contained, and written in natural language.
The response will contain a direct answer to the question and relevant excerpts and sources from the documentation.
Use this mechanism when the answer is not explicitly present in the current page, you need clarification or additional context, or you want to retrieve related documentation sections.
### **Step 10: Create the O-Ring**
Ensure **Diameter mode** is selected, type **0.6 millimeters** for the diameter, and press **Enter** twice.

### **Step 11:** Save in the Curator Panel
Select everything and save it in the **Curator** panel.

### **Video Lesson**
{% embed url="" %}
**Next Step**: Start with the second model.
---
# Agent Instructions: Querying This Documentation
If you need additional information that is not directly available in this page, you can query the documentation dynamically by asking a question.
Perform an HTTP GET request on the current page URL with the `ask` query parameter:
```
GET https://docs.rhinoartisan.com/tutorials/iconic-fashion-creations/bezel-set-pendant/bail.md?ask=
```
The question should be specific, self-contained, and written in natural language.
The response will contain a direct answer to the question and relevant excerpts and sources from the documentation.
Use this mechanism when the answer is not explicitly present in the current page, you need clarification or additional context, or you want to retrieve related documentation sections.